good start
thanku
i do not understand
1 year ago
Written By Ashish
how we can setup telnet on linux disttribution and aws
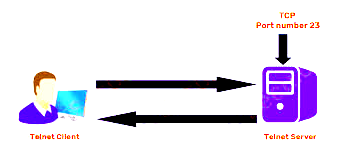
Telnet is a network protocol that allows users to remotely access a device over the internet or local network. Setting up a telnet server can be a useful tool for administrators who need to manage multiple devices from a central location.
steps to set up a telnet server on a Linux-based operating system .
Step 1: Install Telnet server
The first step is to install the Telnet server on your system. Depending on your Linux distribution, the Telnet server may already be installed, but if it is not, you can install it using the package manager.
On Ubuntu and Debian-based systems, run the following command:
On CentOS and Fedora-based systems, run the following command:
Step 2: Configure Telnet server
Once you have installed the Telnet server, you need to configure it to work with your system. Open the configuration file for the Telnet server using your favorite text editor. On Ubuntu and Debian-based systems, the file is located at `/etc/inetd.conf`, while on CentOS and Fedora-based systems, it is located at `/etc/xinetd.d/telnet`.
or
In the configuration file, you will see a line that looks like this:
You need to uncomment this line by removing the "#" symbol at the beginning of the line.
Change it to:
Save and close the file.
Step 3: Restart Telnet server
Now that you have configured the Telnet server, you need to restart it to apply the changes you made. On Ubuntu and Debian-based systems, run the following command:
On CentOS and Fedora-based systems, run the following command:
Step 4: Test Telnet server
To test the Telnet server, you need to connect to it from another device on your network. Use the Telnet client to connect to the Telnet server by typing the following command:
Replace `<ip-address>` with the IP address of the device running the Telnet server. You will be prompted to enter a username and password to log in to the device.
If you are able to connect to the Telnet server and log in, then the setup is complete.
Setting up a Telnet server on AWS is a bit different than setting up a Telnet server on a local server. In this blog, we will walk you through the steps to set up a Telnet server on an AWS EC2 instance.
Step 1: Launch an AWS EC2 Instance
The first step in setting up a Telnet server on AWS is to launch an EC2 instance. To do this, log in to your AWS account and navigate to the EC2 dashboard. From there, click on the "Launch Instance" button.
Select an Amazon Machine Image (AMI) that includes Telnetd, such as the Ubuntu Server or Amazon Linux AMI. Choose an instance type that suits your needs and follow the prompts to configure the instance settings.
Step 2: Connect to the EC2 Instance
Once your EC2 instance is up and running, you need to connect to it to install and configure the Telnet server. To do this, you can use a remote desktop protocol such as PuTTY or SSH.
To connect to the EC2 instance using PuTTY, you will need to download and install the PuTTY client. Then, open PuTTY and enter the IP address of the EC2 instance in the appropriate field. You will then be prompted to enter your username and password to log in to the instance.
Step 3: Install and Configure Telnet Server
Once you have connected to the EC2 instance, you need to install and configure the Telnet server. Depending on the AMI you chose, you may already have Telnetd installed. If not, you can install it using the following command:
After installing Telnetd, you need to configure it to meet your specific requirements. The configuration file for Telnetd is located at /etc/inetd.conf. Open this file with a text editor such as nano or vim:
By default, Telnet is usually disabled in this file, so you need to uncomment the following line to enable it:
Remove the "#" symbol from the beginning of the line to uncomment it.
Step 4: Restart Inetd Service
After making changes to the /etc/inetd.conf file, you need to restart the inetd service for the changes to take effect. Run the following command:
This command will restart the inetd service and activate the Telnet server.
Step 5: Test Telnet Server
Now that you have set up the Telnet server, you can test it by connecting to it from a remote client. To do this, you will need a Telnet client such as PuTTY or the built-in Telnet client on Windows.
Open the Telnet client and enter the IP address of the EC2 instance in the appropriate field. You will then be prompted to enter your username and password. If you have set up the server correctly, you should be able to log in and access the server's command line interface.
Step 6: Secure Telnet Server
As mentioned earlier, Telnet is an insecure protocol that sends all data, including passwords, in clear text. Therefore, it is important to secure your Telnet server by using secure alternatives like SSH or implementing additional security measures such as firewall rules and user restrictions.
Conclusion
good start
thanku
i do not understand